SNOWFLAKE OBJECT TAGGING WITH DBT MACROS
February, 2024
This article will guide you through the concept of object tagging in Snowflake and introduce the macros I’ve developed for utilizing object tagging within DBT.
In a landscape where GDPR poses challenges, it is good to keep in mind that databases such as Snowflake provide object tagging capabilities enabling efficient data tracking and classification. Object tagging extends beyond GDPR compliance, offering any kind of classification of Snowflake objects such as dynamic data masking, sensitive data and dependency tagging, project-based object classification, grouping virtual warehouses for better performance and anything you can come up with when it comes to object classification. Employing object tags is a great way to organize your objects in the database and simplify the development processes.
Creating Tags
Tags in Snowflake follow a key-value pair principle and are established at the schema level, applicable to various Snowflake objects such as warehouses, tables, views, columns, accounts, roles, users, pipes, policies, shares, and more. The APPLY TAG privilege is essential for working with tags, exclusively granted by the ACCOUNTADMIN role, which can delegate this privilege to other roles. CREATE TAG on the other hand can be granted to other roles by the owner role of the schema. Once created, a tag can be applied to multiple Snowflake objects by roles with APPLY ON TAG privileges on the tag. Each object can be associated with up to 50 unique tags simultaneously.
Below, you’ll find the scripts detailing how I structured roles and privileges to create tags, following the hybrid policy action management principle (Picture: 1). Typically, separate roles are used for creating tags as a tag admin and letting other roles to apply the tags themselves by assigning APPLY ON TAG privileges to them. This approach is called hybrid management for executing policy actions. In the example provided below, I’ve implemented hybrid management by creating a TAG_ADMIN role for tag creation in the POLICY_DB database and assigning APPLY ON TAG privilege to the dbt_demo_wrt role, which executes the scripts in DBT.
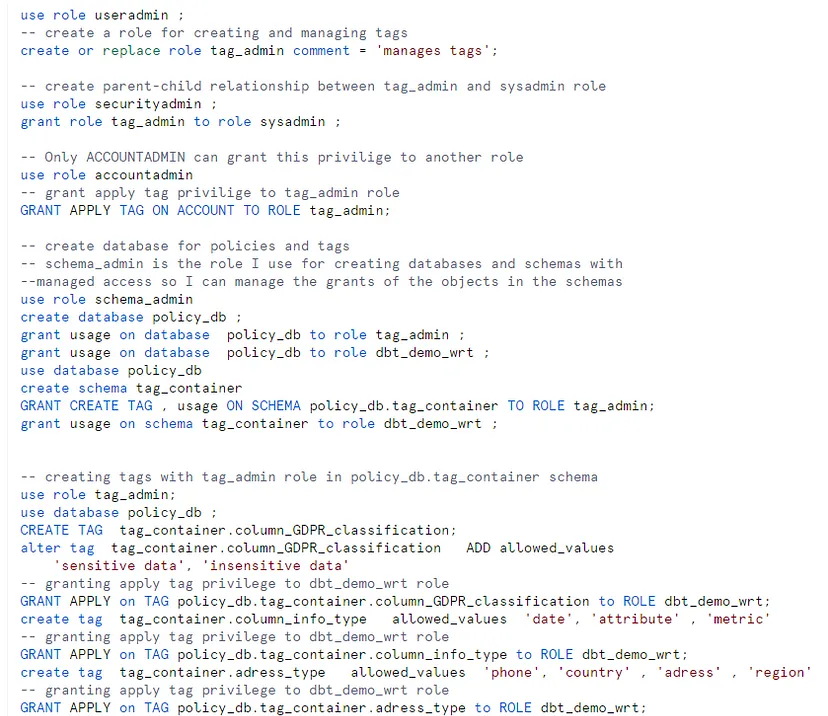
In addition to hybrid management, there are two other policy action approaches: centralized management and decentralized management. With centralized management, a single role handles both tag creation and application, exclusively dedicated to policy management. On the other hand, decentralized management employs various roles for creating and applying policies.

Tagging Objects in Snowflake By Using DBT Macros
This was the tricky part I had to deal with, as I wanted to define and execute the object tags on DBT. DBT has some useful built-in functionalities that are specific to Snowflake such as query tagging and defining table types. It is also possible to use packages in dbt — Package hub (getdbt.com) and include more functionalities in DBT projects. Yet, object tagging is not supported as a functionality we can include in our code. However, leveraging macros enables the implementation of object tagging within DBT projects, providing a workaround solution.
So, I decided to employ meta definitions in YAML files to implement object tagging within my DBT code, specifically for table and view columns. As you can see in the picture below ( Picture:3), I defined “tag_definition” and “snowtag_policy” under meta definitions for tagging columns in src_meta.yml file. “tag_definition” and “snowtag_policy” are the definition names I chose. You can always choose other names for your practices. Here are the steps I followed to implement macros for Snowflake object tagging in DBT.
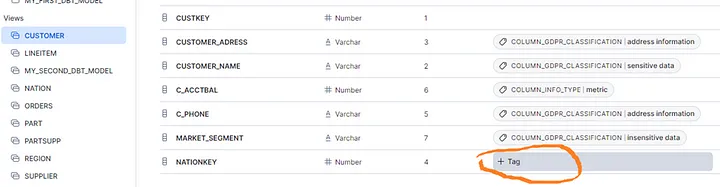
1 — ) The initial step involves utilizing YAML files to specify the objects to be tagged. In the image below, the column_GDPR_classification tag is employed to tag CUSTOMER_NAME, MARKET_SEGMENT and C_PHONE columns as “sensitive data” and “insensitive data”. These tags are outlined within the “snowtag_policy” and categorized under “tag_definition” (‘Picture: 3’).
(See the image (Picture:1) above for checking how column_GDPR_classification is created)

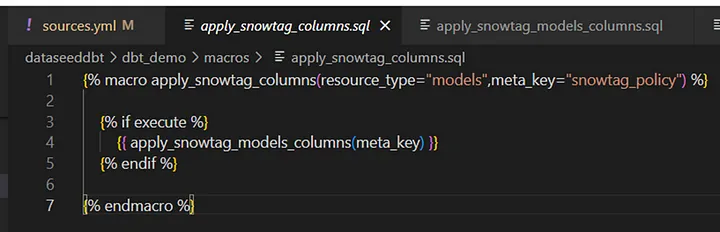
2 — ) Passing “snowtag_policy” to meta_key as a parameter (Picture:4) and employing “tag_definition” (Picture: 5) to retrieve values from meta values for the columns in YAML files. The macro {{apply_snowtag_models_columns(meta_key) }} is executed for all the nodes.

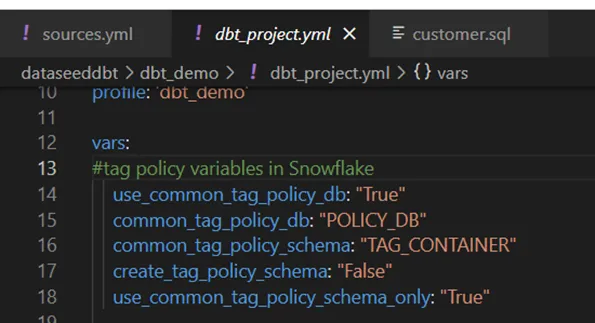
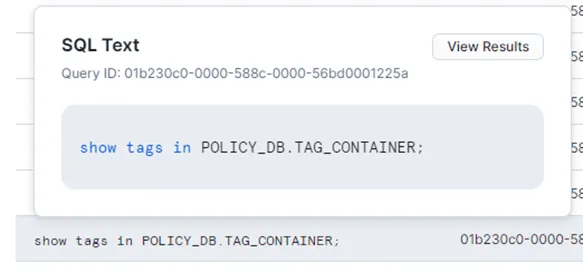
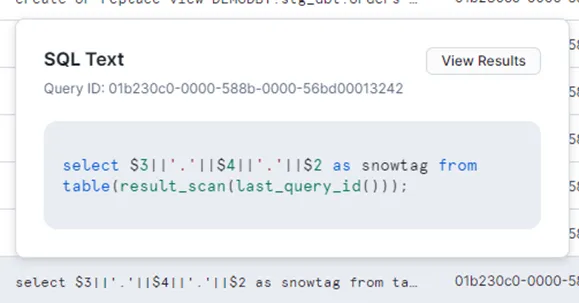
3 — ) This step retrieves the tags created in TAG_CONTAINER schema. The schema information is derived from the global variables defined in the dbt_project.yml file. Executing the macro populates the snowtag_list_sql variable with the tags stored in the TAG_CONTAINER schema (Picture: 7).
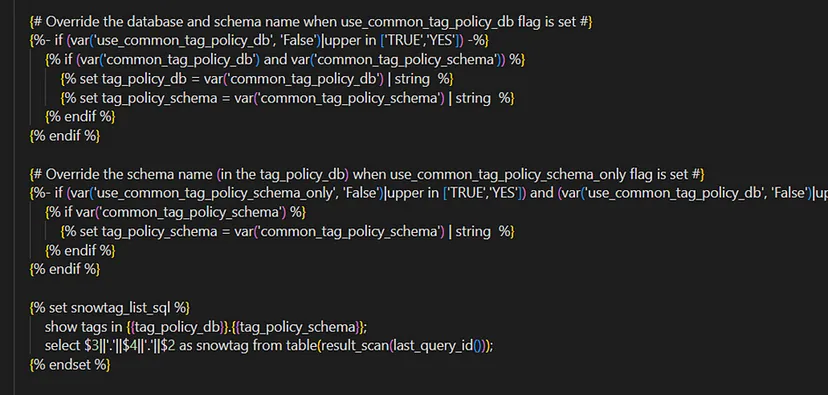
4 — ) During the execution of the DBT project, the macro is invoked in the post-hook for all the meta information specified for the models in YAML files (Picture: 8). Within the macro, database and schema information is retrieved from global variables, and tags defined in YAML files are iteratively matched with those under the POLICY_DB.TAG_CONTAINER schema, accessible to the dbt_demo_wrt role.
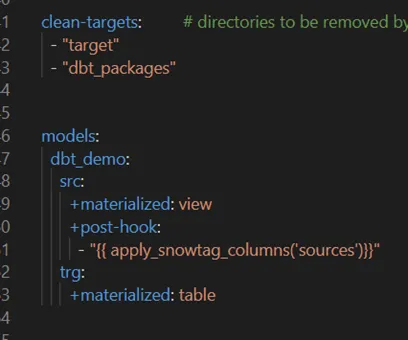
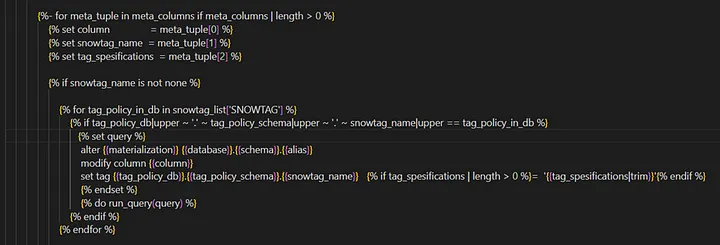
5 — ) Finally, the macro executes the code responsible for running the scripts to set tags for each column with a value in snowtag_policy under the meta definition in YAML files, thereby creating the tags (Picture:9).
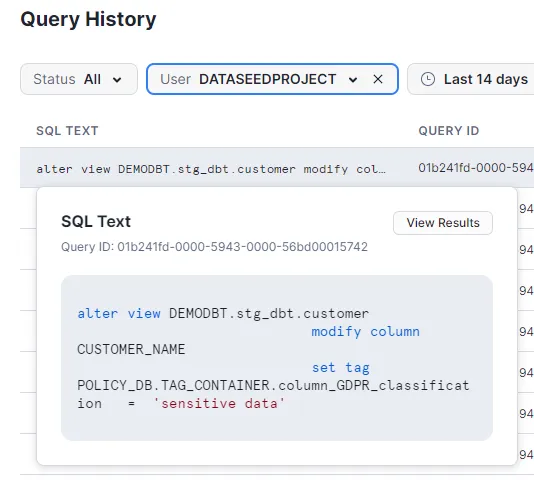
Following the execution of DBT models and application of the {{apply_snowtag_columns(‘sources’)}} macro in the post-hook, you can review the scripts in Snowflake under “Query History” tab as demonstrated in the images below (‘Picture : 10’, ‘Picture : 11’ , ‘Picture:12′)
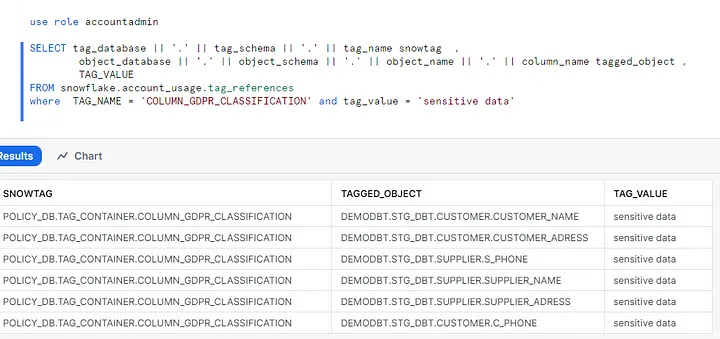
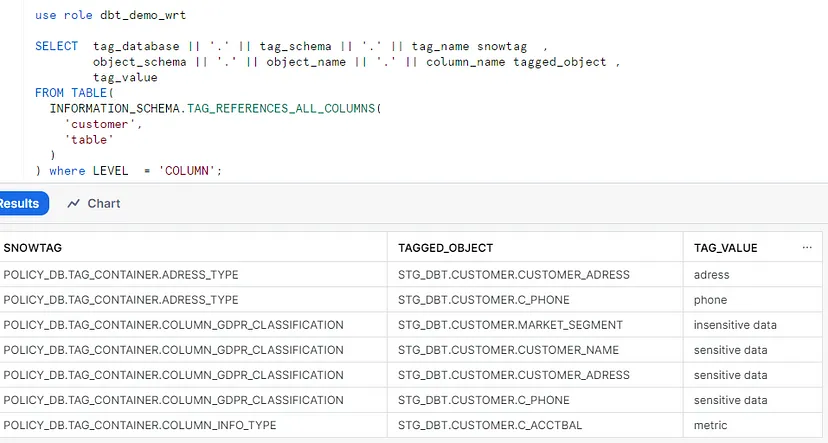
Now the tags we defined in YAML files by using “snowtag_policy” and “tag_definition” under meta definitions are created. So, we have the ability to view columns based on tag definitions and categorize them by querying the tag_references view in the snowflake.account_usage schema or table functions like tag_references or tag_references_all_columns in information_schema. Accessing “account_usage” schema requires ACCOUNTADMIN role or a role granted the GOVERNANCE_VIEWER database role (refer to the link : Account Usage | Snowflake Documentation). By using account_usage schema (Picture: 13) we can review the items under the tags globally, while using information_schema only provides a limited review on the tags and lists the tags per accessible objects such as tables, views, warehouses.
Below you can observe how effortless it is to categorize sensitive objects through simple queries. In my demo project, you can see sensitive columns I’ve tagged, as illustrated in ‘Picture: 13′.
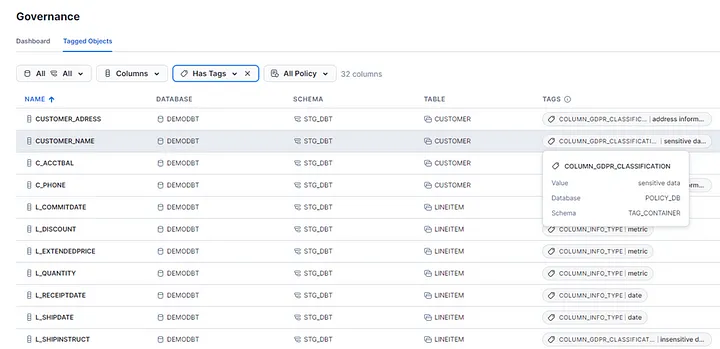
Additionally, reports for the tags can be extracted from the Governance tab via the Snowsight interface. Accessing data under Governance requires appropriate permissions, namely the GOVERNANCE_VIEWER database role or the ACCOUNTADMIN role, as mentioned earlier. Moreover, navigating through the objects allows for viewing tags and applying existing tags to items (‘Picture : 16’).

Leave a Reply